Monthly Archives: October 2011

I Bought The Cow

Many of you like the idea of eating well.  Organic fruits and veggies.  Free range chicken.  Grass-fed beef.  The downside is often the expense.

I hear ya!

Since I eat a lot of protein, my meat bill is rather ridiculous.  I usually get a few pounds of grass-fed ground beef and some free range chicken breasts for the week and it’s about $30.

BUT there may be another solution!

My husband, knowing my love of all things beef and my need to find the best deal possible, bought an eighth of a grass- fed cow. 

I mean a Steer.  After this great surprise windfall of beef, I became educated:

  • A Cow is a bovine that has had a calf
  • A Heifer is a bovine that has not had a calf
  • A Steer is a castrated bovine used primarily for beef
  • A Bull is a bovine used for breeding purposes
  • A Calf is a young bovine that is still on its mother’s milk

Anyway, some friends asked us if we “wanted in on a grass-fed cow” and there was no question! 

There is actually a word for this–like-minded, carnivorous friends who get together and purchase a steer and each take a fraction of the butchered beef is called COWPOOLING.  Huh.

Anyway, our cowpool friends dropped off our delivery Saturday night and I am amazed at the amount of beef we got (shrink-wrapped, labelled and frozen) for the price we paid.  We got a little bit of everything:

  • 8 or 10 Steaks (rib-eye, sirloin)
  • 4 or 5 packages of Stew Meat
  • 4 big Short Ribs
  • 10 packages of Ground beef
  • 22 Hamburger Patties
  • 4 packages of Jerky
  • 2 packages of Beef Sticks
  • 1 package of Bologna (looks like salami to me)

And that’s one 1/8th of the Steer?! There’s no doubt in my mind that this is a good deal. 

But why is grass-fed beef superior healthwise to conventional beef?

  • Higher in Omega-3 fatty acids and CLA (conjugated linoleic acid) which reduce the risk of heart disease
  • Lower in fat and calories
  • Higher in Vitamin E (antioxidant, anti-aging)
  • Higher in beta carotene
  • Cows are not given antibiotics or growth hormones

So if you’re in the market to get a big ol shipment of frozen grass-fed beef, check out www.eatwild.com.  It’s a great resource to find farms in your area that offer grass-fed meat.  Some things to keep in mind:

  • It’s less expensive to cowpool and find enough friends to buy a whole Steer.  Some farms will let you buy 1/4, but the price per pound will be higher. 
  • Usually small farms only offer pick up, and  larger farms will ship nationwide (for a pretty hefty fee).  Ours came from Wisconsin somewhere…and thanks to our head cowpoolers who coordinated the pickup, ours was delivered to our back door!
  • You need to order early–there are usually 2 times a year (Spring and Fall) that farms will slaughter their steers, and people reserve theirs months in advance
  • An Angus will yield about 420 pounds of frozen beef and a Dexter will yield about 275 pounds!  Don’t know what type of steer we got…if you are getting more than 1/4 (which can be anywhere from 60-100 pounds of beef!), you’ll need a deep freezer to store and keep all that meat fresh for 6 months.

If you have any questions about cowpooling, please ask…wouldn’t want all of this random knowledge to go to waste 🙂

Recipe: Crispy Meatloaf

I seem to be on a comfort-food roll.

Might be because I’m getting over the world’s most irritating cold.  Or because it’s getting chillier outside and I know how long Chicago winters are…

In an case, this recipe is simply yummy and very satisfying.  Without the parmesan (an there isn’t a lot), it’s Phase 1, so really pretty healthy.

If you’re anything like me (and my husband), and you like your protein, then this recipe with serve 2 people (maybe with a little leftover for lunch).  If you have a bigger family, just double it, but make 2 separate meatloafs on the baking sheet.  I’ve tried making one big one and it was not the best idea I’ve ever had 🙂

This recipe also uses quinoa flakes instead of bread crumbs.  I use them in most recipes that call for bread crumbs with the exception of coating chicken or eggplant, etc.  They’re gluten-free and good on Phase 1.  Here’s what to look for at the store if you’ve never seen a box…it’s usually with the oatmeal.  Make sure you don’t pick up quinoa flour (which is good for some recipes, just not as a substitute for bread crumbs).

1 lb ground grass-fed beef
1 medium onion, grated
1/4 cup + 1 teaspoon tomato paste
1 teaspoon dried parsley
1/4 cup  + 1 tablespoon grated parmesan
1 egg, beaten
1/2 cup quinoa flakes
salt and pepper

Preheat oven to 400°.  Line a baking sheet with aluminum foil and spray with non-stick spray.  Mix all ingredients (except 1 tsp tomato paste and 1 tbsp parmesan) and season with salt and pepper.  Make sure the egg/tomato paste/onion is mixed into the beef, otherwise you’ll get these tough bites of hamburger.  Form into a flat rectangle ~9in long, so it is uniform in thickness and will cook evenly.  Season with salt and pepper.   Spread remaining tomato paste on top and sprinkle remaining parmesan. Season with salt and pepper.  Bake 40-50 minutes.

My favorite part is the end…it’s definitely a little crispy.  I can’t stand soggy meatloaf…which is probably why I like the free form version better than the one made in a loaf pan.

But don’t take my word for it.  Take 5 minutes and whip one of these up for yourself and let me know what you think!

What’s in your meatloaf? (Or shouldn’t I ask???)

Recipe: Roasted Vegetables

Now that the weather has gotten a bit colder, I’ve switched from some type of green salad for dinner to roasting some vegetables. 

There are so many combinations of vegetables and spices that you could literally make a different vegetable dish every fall or winter evening.

Last night, I wanted a little of everything, so I used red and yellow onion, garlic, red peppers, broccoli, butternut squash and carrots.  I tossed them with some olive oil, spread them out on a sheet pan and used salt, pepper, garlic powder and thyme.  That seems to be my go-to spice combination.  It’s familiar and safe.  And I know my husband will eat it 🙂  I roasted them at 450° for 20-25 minutes and they were delicious 🙂

What could be easier than pulling out an assortment of vegetables from your frig and chopping them?  This is why I make them 4-5 times a week.  I’m a bit lazy.  But I also know what tastes good.  And is healthy 🙂

I realize this isn’t so much a recipe as a technique.  I have an ulterior motive.  I need to branch out from my “safe” spice combinations and try some new ones.  So,

What are your favorite spices to use on roasted vegetables?

Recipe: Homemade Chicken with “Rice” Soup

Ok, I didn’t really use rice.  But it was cold and rainy outside and because my cold is still hanging on for dear life, I wanted chicken with something soup.  

This is Day 10, for anyone keeping count…yikes!  I truly believe the reason this one is so brutal is because I was in Vancouver when it started and I didn’t have my stash of homeopathic remedies that I usually take when I feel that first sign of a cold. (On top of not being in control of my meals for 4 days!)  By the time I got home, it was Day 4 and the cold germs were already invested in seeing this one through 🙂  But I digress…

This soup tastes just like chicken with rice, except there’s more “rice”.  I used buckwheat, because it’s a seed (not a grain) and very healthy for you. (So it’s good for the Phase 1 diet.)

2 tablespoons olive oil
2 medium onions, chopped
2 large shallots, chopped
2 cloves of garlic
5 carrots, chopped
4 ribs of celery, chopped
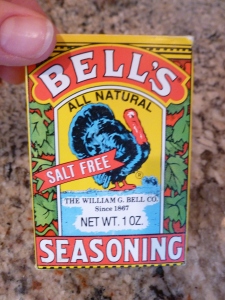
2 teaspoons Bells Seasoning
2 bay leaves

1 lb organic, free range chicken, cut into bit size pieces
1 cup buckwheat

4 cups chicken broth
4 cups water
salt and pepper

In a large pot or dutch oven, heat 1 tbsp of olive oil over medium heat.  Saute all vegetables until soft and lightly browned.  Season with salt and pepper and 1 teaspoon of Bells Seasoning.  Remove from the pot.  Add remaining tablespoon of olive oil and brown the chicken pieces.  Season with salt and pepper and remaining teaspoon of Bell’s Seasoning.  Add 1 cup of broth and scrape the brown bits from the bottom of the pan.  Add remaining 3 cups of broth and 2 cups of water.  Add buckwheat and the bay leaves and bring to a boil. Simmer for 30 minutes, adding more water as buckwheat absorbs liquid.  Makes about 6 servings.


Not sure about buckwheat? It’s a seed, but like quinoa, looks more like a grain. (And you also need to rinse it in cold water before cooking it, just like quinoa.)  It even says “Whole Grain” on the package. (My box of quinoa does too.) I don’t know what’s worse: that companies put whole grains on their boxes to entice people to buy them, or that the manufacturers don’t know what type of product they’re producing?! 

Buckwheat is a seed from a plant related to rhubarb.  It’s high in fiber and protein, and supplies essential amino acids.  It is also a great source of the bioflavonoid rutin. And it’s gluten free.

As for the Bell’s Seasoning, it’s a salt free blend of rosemary, oregano, sage, ginger, marjoram, thyme and pepper. Much easier than adding them all separately 🙂

So next time you’re feeling a tickle in your nose or the weather outside is frightful, whip up a pot of this soup. It really doesn’t take much time at all (it’s really only chopping), and it’s quite hearty because of the buckwheat. And you’ll have enough to last for a few days……

Do you make homemade soup or do you crack open a can of soup?

What My Kids Eat For a Snack

Since most everyone I know is aware of my eating habits (i.e. no sugar or gluten…most of the time!), I get asked about the eating habits of my kids. A LOT.

Clearly making a 4 and 7-year-old eat meat, fish, vegetables and fruit (with a few “grains” — seeds actually — like quinoa and buckwheat) is rather impossible. I’m health-minded, not CRAZY.

But I also don’t have any Oreos or Cheetos in my pantry either.

There’s a  middle ground, and until my kids are older and can make decisions on healthy eating for themselves, I can prepare good meals (and snacks) and hope some of it is rubbing off on them.

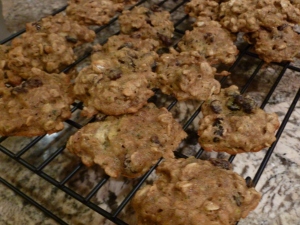
Like today.  My 7-year-old wanted to bake something with me. We pulled out one of my favorite cookbooks for healthy snacks (Deceptively Delicious by Jessica Seinfeld) and decided to make the Oatmeal Raisin Cookies. They have old fashioned oats, zucchini and banana…just a tad healthier than most oatmeal raisin cookies 🙂

I only made a few minor changes to the recipe: I used real butter instead of margarine and added more cinnamon (~1 teaspoon). I also skimped a bit on the brown sugar (somewhere between 1/2 cup and 3/4 cup).

We usually don’t make a habit of dessert at our house (go figure!), but a few nights a week, they have a popsicle (real fruit or leftover smoothie) or something like this.  My son ate two of these and said they were perfectly delicious (and he helped me make them, so he knew fully well there were some green veggies inside).  He’s the pickier eater between the two, so I’d say that’s a pretty good endorsement 🙂 

I had to try one and I must admit they had good flavor…I liked the cinnamon and banana combination (you couldn’t taste the zucchini at all).

So if you’re a cookie-after-school kind of mom, you might want to grab a copy of this book (most libraries have one so you can test some of the recipes or they’re super cheap on ebay).  There are 5 or 6 different recipes that I make fairly often for my kids.  I really like some of her pumpkin and squash chocolate chip muffin/cupcake recipes (without the frosting), the brownies and the blueberry bars…

So what kind of snacks do I give my kids (other than the previously mentioned baked items with vegetables?)–Fruit leather, whole fruit, smoothies, kale chips, homemade sweet potato fries…think outside the box. Literally!

What other healthy snacks do you give your kids after school? (Or yourself after a long day of work??)

Recipe: Healthy Chili

Just as I’m gearing up for stews, soups and crock-pot wonders — it is mid-October after all — Mother Nature throws us a curve ball. 

It was 73° today in Chicago.  I was wearing shorts and a t-shirt.  Hardly that crisp cool weather that merits pulling out the dutch oven.

BUT, that’s exactly what I did…

This chili recipe is full of flavor and surprising easy…and VERY healthy! Phase 1, of course 🙂

2 onions, chopped
2 red bell peppers, chopped
1 tablespoons olive oil
2 lb grass-fed ground beef
2 1/2 cups organic chicken broth
1 cup tomato sauce
2 tablespoons tomato paste
1 teaspoons chili powder
1 teaspoon cumin
1 1/2 teaspoons paprika
2 teaspoon garlic powder
2 bay leaves
1 1/2 teaspoon salt, separated
avocado, optional

Preheat a dutch oven over medium heat.  Saute the onions and peppers with 1/2 teaspoon salt in the olive oil until soft and lightly browned.  Remove from the vegetables from the pot to a bowl.  In same pot, brown ground beef and add spices (and remaining teaspoon of salt).  Add vegetables back to pot with chicken broth. Scrap bottom of pot to get brown bits off.  Add tomato paste and tomato sauce.  Simmer for 30 minutes.  Serve with avocado garnish. Serves 4-5.

The ingredient list looks fairly long until you realize that almost half of them are spices. 

Give this recipe a whirl…you won’t be disappointed!  But maybe you’ll have more sense to wait until the weather actually warrants some healthy comfort food!

Are Colds Inevitable?

Remember when I mentioned that I hardly ever get sick anymore?

I should have knocked on some wood.  I got a cold this week.

I didn’t actually get it, I received it. From the kind lady sitting next to me on my flight to Vancouver who liked to share her life story.  And her germs.  A big ol sneeze in my face.  Really?!

Anyway, the cold manifested itself the day after I landed.  Had I been at home, I have quite a few things I try when I feel like I’ve been exposed to cold germs or may be coming down with something:

The  supplements are all sitting in a clear storage box, standing at the ready, waiting to be used (which isn’t all that often).  And they usually dramatically help the situation and the cold doesn’t develop into a full-blown situation.

BUT, I was traveling and didn’t imagine the great need for cold remedies on a 4 day trip.  So they were at home. Useless to me.

When I went to the Canadian pharmacy, the only items I felt comfortable buying were Vitamin C and a small tube of Vaseline for my Rudolph nose.  And a bunch of those pocket-size Kleenix packages.

Had I been visiting for longer, I would have let the cold run its course.  But because my return flight was 48 hours later, I needed to speed up the process. (Have you ever flown with a cold? Wow, your ears feel like they just want to explode!)

So I turned to over-the-counter meds. Not my favorite option usually, but I needed relief.  Fast!

The pharmacist recommended Dristan (Afrin), which I’m not usually a fan of (there’s a rebound effect with this medicine and it isn’t safe to take more than a day or two in a row), but desperate times call for desperate measures. I also loaded up on my vitamin C and oregano (since I never leave home without it!). My colds have a tendency to go deeper into my chest (perhaps because of my history with asthma?) and the oregano helps to prevent that from happening. It’s also an anti-viral, and colds are viruses, so it’ll help clear it out faster too.

I got home on the red-eye this morning. And the good news is that my ears are still attached to my body.  It was rather painful on the quick descent on the first leg, but then I took some Motrin and that seemed to help for the second leg of my journey.

So what’s the takeaway message here?

Prevention.  When you’re traveling, make sure to wash your hands often (especially before eating or rubbing your eyes), and if you’re seated next to someone with an obvious cold, you might even move to a different seat if your flight isn’t full.  (I would have, but the plane was at capacity.)  And get plenty of rest before you go on your trip since a sleep debt is a contributing factor to how well your immune system will react under pressure.  (My sleep before the trip was average at best.  This, I’m sure, contributed to the severity of the cold.)

And next time I’ll bring my cold remedies. If I bring them I won’t need them. Kind of like an umbrella.

Oh.  And I will be practicing my dodge and duck reflexes to avoid this situation in the future!

Do you have any vitamins, supplements, remedies you use when you feel a cold coming on?


The Berry and Veggie Smoothie Your Kids Will Love

How many of you have trouble getting your kids to eat fruits and/or vegetables? 

I don’t have that trouble, per se, but my kids have definite opinions: broccoli, peas (sometimes) or kale chips for dinner and carrots, celery (sometimes) or red peppers for lunch.  Lettuce and spinach haven’t hit their radar yet.

UNLESS the spinach is hidden, like in the Deceptively Delicious Brownies…OR in these smoothies!

1 1/2 cup water
1 serving grass-fed whey protein powder
1 1/2 cup frozen organic mixed berries
1/2 cup frozen pineapple
1 cup frozen organic spinach
1 cup greek yogurt

Blend until thoroughly mixed and serve immediately. Makes 4 servings.

My kids love these! 

If you use larger amounts of darker berries (blueberries and blackberries), the green flecks from the spinach will be hidden better. Today I had mostly raspberries and strawberries, so my smoothies were lighter pink and the flecks were seen (but I told them it was the blueberry). 

I’m not sure why I didn’t just fess up, but this was only the second time I’d added a vegetable to their favorite afternoon snack and I wanted to make sure they liked them before the truth came out–this way IF they whine next time, I can remind them that they did, in fact, like them quite bit 🙂

These could easily be served for breakfast because of the protein powder.  Although if you’re thinking about drinking these in the car, they are a bit messy…mine are pretty thick so sometimes they eat them with a spoon. But you could use more liquid (you could even use almond or coconut milk to make them even more healthful–but we have a nut allergy, so we stick with water).

I think I’m going to freeze the leftovers into popsicles.  The kids will like those for dessert one night…

Are you a strictly berry smoothie lover or have you ventured into the vegetable realm for your frozen concoctions?

My Bare Essential Supplements and Vitamins

I am going on a trip.  On Tuesday.  To a different country! 

As I’m making lists of items not to be forgotten, I got a little stuck when it came to supplements and vitamins.  I don’t take any prescription medications for my asthma or PCOS anymore, but I rely on supplements and vitamins (and of course a healthy diet) to keep me healthy and strong. And I take more than most.

Here is my bare essential list so far:

I am also bringing some supplements for blood sugar as my PCOS is usually under control at home, but I have less control over my diet when I travel, so better safe than sorry!

These are the ones I take everyday, without exception. (Except the oregano…those are on an as-needed basis.)  I feel GOOD on this particular regimen.  Along with my diet, these are keeping me healthy as most people in my neck of the woods are starting to gets sniffles and coughs.

So here are some questions for YOU:  For those who travel (solely with carry-on baggage) with supplements/vitamins (not RXs), do you leave the pills in the bottles, or do you stick them in a ziplock bag? And what about the gelcaps? They’re technically liquid, so do you put them in your 1 qt liquid bag? What vitamins and supplements are you sure to have in YOUR suitcase?

Strangely, on airline websites, travel blogs, and other areas for information, this particular topic has varied answers, which surprises me since rules for travel these days are pretty strict.

Hopefully I can figure this out in the next 36 hours 🙂